For this tutorial you’ll want to find a photo of someone doing something that looks a bit larger than life. I used this photo that I found at the stock photo website Stock Exchange. For this tutorial you’ll need a photo that you want to manipulate and some special brush sets which I downloaded from here.
This will be the final result.

# Download the brush set and install it.
# Now I’ll show how to take a child with a big imagination and turn him into the powerful being he imagine himself to be.
# We’ll start by creating a new layer on top of our original and filling it with black. Next we want to select Filter >> Render >> Lighting Effects >> Lens Flare
# Use the 105mm Prime with the Brightness setting of your choice.
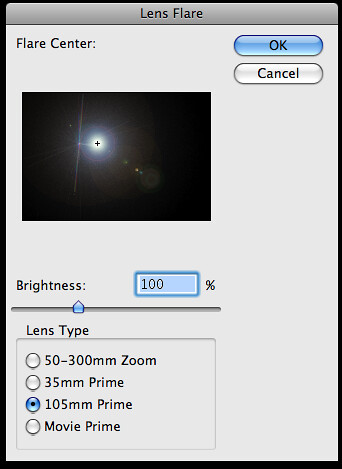
# This will create a bright flash. Move it to the point where you want the ‘energy ball’ to appear.
# You may notice that when you move it, you can see the edges of the layer. To rectify this, select the layer and add a ‘Layer Mask’.
# Select default colors (white and black). With the layer mask selected, use the Gradient Tool >> Radial Gradient >> Reverse and drag from the center outwards. This will mask everything in a sphere around the center.
# Set both of these layers to the ‘Hard Light’ setting.
# I like to use the Image >> Adjustments >> Photo Filter to make the colors “pop”. I also used this setting to make the lens flare a bluish color. There are other ways to do this so experiment with your options.
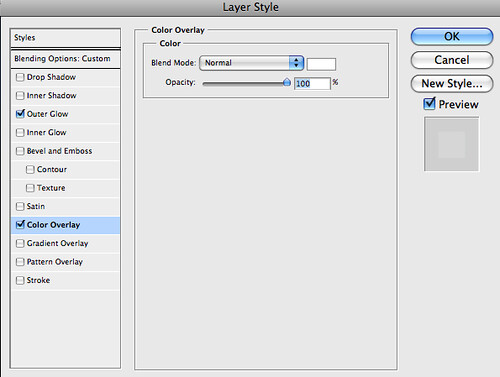
# Using the Brush set we installed earlier we want to apply them to the energy balls. I used the color black, with the layer’s Blend Options set to ‘Overlay’.
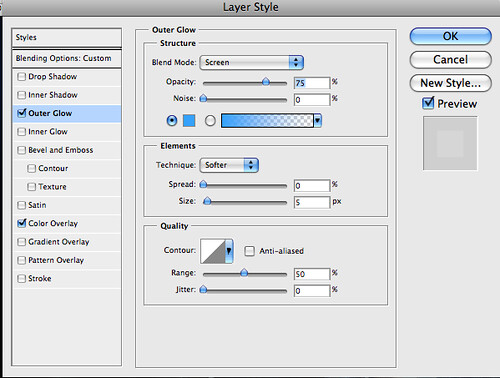
# With this layer selected, set the Layer Style settings like so:
# Using the same technique that we used in Step 7, we want to mask the edges of our brush layers.
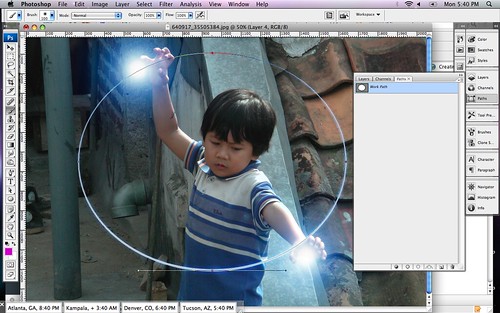
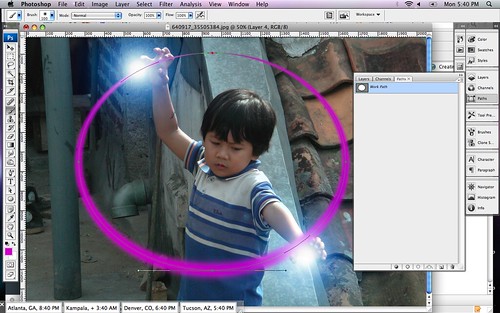
# To create the ‘arc of light’ we’ll use paths. Select the ‘Ellipse Tool’ and change it from ‘Shape layers’ to ‘Paths’. Now, draw a large circle or ellipse that includes both energy flares.
# Once the arc is drawn we want to stroke it (no jokes please). Select a brush that’s very small, maybe about a brush with a 5px diameter and use the color white. Go to ‘Paths’ right click on the selected path, and select ‘Stroke Path’. Check the ‘simulate pressure’ option, this will give the ring a bit of perspective with a heavier stroke on one side and a lighter stroke on the opposite side.
Repeat this step twice. Each time use a different brush setting that is bigger than the one before it. I started with the 5px brush, then I used a 45px brush followed by a 100px brush. Each time use a different color. The topmost (bigger) arc should be set to ‘Linear Dodge (Add)’ with an opacity of 35%. The middle layer should be set to ‘Overlay’ and the original (the white one) should be set to ‘Linear Dodge (Add)’.
# I grouped these together then, using the technique from Step 7 again, I use layer masking to block one half of the sphere I created.
# To create the energy ‘tendrils’ that are leaping from the arc. Duplicate the grouped folder from Step 16. Then merge the group or folder into one layer. Select Filter >> Liquify and distort the arc to look like it should for your image. Secondly, we’ll select Filter >> Distort >> Ripple and tweak it to look a bit more like electricity.
# Now we’re done. Outside of some techniques that I used to make the image more polished, this completes the tutorial.
This will be the final result.
# Download the brush set and install it.
# Now I’ll show how to take a child with a big imagination and turn him into the powerful being he imagine himself to be.
# We’ll start by creating a new layer on top of our original and filling it with black. Next we want to select Filter >> Render >> Lighting Effects >> Lens Flare
# Use the 105mm Prime with the Brightness setting of your choice.
# This will create a bright flash. Move it to the point where you want the ‘energy ball’ to appear.
# You may notice that when you move it, you can see the edges of the layer. To rectify this, select the layer and add a ‘Layer Mask’.
# Select default colors (white and black). With the layer mask selected, use the Gradient Tool >> Radial Gradient >> Reverse and drag from the center outwards. This will mask everything in a sphere around the center.
# Set both of these layers to the ‘Hard Light’ setting.
# I like to use the Image >> Adjustments >> Photo Filter to make the colors “pop”. I also used this setting to make the lens flare a bluish color. There are other ways to do this so experiment with your options.
# Using the Brush set we installed earlier we want to apply them to the energy balls. I used the color black, with the layer’s Blend Options set to ‘Overlay’.
# With this layer selected, set the Layer Style settings like so:
# Using the same technique that we used in Step 7, we want to mask the edges of our brush layers.
# To create the ‘arc of light’ we’ll use paths. Select the ‘Ellipse Tool’ and change it from ‘Shape layers’ to ‘Paths’. Now, draw a large circle or ellipse that includes both energy flares.
# Once the arc is drawn we want to stroke it (no jokes please). Select a brush that’s very small, maybe about a brush with a 5px diameter and use the color white. Go to ‘Paths’ right click on the selected path, and select ‘Stroke Path’. Check the ‘simulate pressure’ option, this will give the ring a bit of perspective with a heavier stroke on one side and a lighter stroke on the opposite side.
Repeat this step twice. Each time use a different brush setting that is bigger than the one before it. I started with the 5px brush, then I used a 45px brush followed by a 100px brush. Each time use a different color. The topmost (bigger) arc should be set to ‘Linear Dodge (Add)’ with an opacity of 35%. The middle layer should be set to ‘Overlay’ and the original (the white one) should be set to ‘Linear Dodge (Add)’.
# I grouped these together then, using the technique from Step 7 again, I use layer masking to block one half of the sphere I created.
# To create the energy ‘tendrils’ that are leaping from the arc. Duplicate the grouped folder from Step 16. Then merge the group or folder into one layer. Select Filter >> Liquify and distort the arc to look like it should for your image. Secondly, we’ll select Filter >> Distort >> Ripple and tweak it to look a bit more like electricity.
# Now we’re done. Outside of some techniques that I used to make the image more polished, this completes the tutorial.
Installed Operating Systems: macOS Monterey 12.x - Windows 11 Pro (Insider)
CPU: Ryzen 5 5600X Motherboard: ASUS ROG Strix X570-F Gaming RAM: 16GB 3200Mhz Graphics: XFX RX 480
HDD: 1TB MP400 - 500GB 960 EVO - 250GB MX500 - 640GB WDC - 500GB WDC
Other: USB Bluetooth - USB Wireless Mouse and Keyboard Bootloader: OpenCore
CPU: Ryzen 5 5600X Motherboard: ASUS ROG Strix X570-F Gaming RAM: 16GB 3200Mhz Graphics: XFX RX 480
HDD: 1TB MP400 - 500GB 960 EVO - 250GB MX500 - 640GB WDC - 500GB WDC
Other: USB Bluetooth - USB Wireless Mouse and Keyboard Bootloader: OpenCore


